Getting Started
Installation
Unity 6000.0 or later is required
Installation via UPM (Git URL)
Refer to the Unity documentation and add the following URL:
https://github.com/fireskyvvv/Haikara.git#upmYou can also install by directly editing Packages/manifest.json:
{
  "dependencies": {
    ...
    "com.katen.haikara": "https://github.com/fireskyvvv/Haikara.git#upm",
    ...
  }
}
Installation via UnityPackage
Download the .unitypackage from the releases page and extract it in the Unity Editor.
Tutorial
1. Setting up asmdef
Once Haikara is installed, first set up the Assembly Definition.
Add Haikara.Runtime to the Assembly Definition References of the .asmdef you created (or an existing one).
2. Creating the ViewModel class
Create the elements to be bound. Create a ViewModel class as shown below (write the namespace to match your environment):
using Haikara.Runtime.ViewModel;

namespace Haikara.Samples.FirstSample.Runtime.View
{
    public class FirstSampleViewModel : ViewModelBase
    {
        [CreateProperty] public string Label { get; } = "Hello, Haikara!";
    }
}
CreateProperty Attribute
A property to be bound to a VisualElement requires the CreateProperty Attribute.
Although only a getter is implemented in this example, a setter is required depending on the BindingMode.
3. Creating .cs and .uxml files
Create a .cs and .uxml file in any folder included in the .asmdef you created.
.cs files can be created via Create > Scripting > Empty C# Script, and .uxml files via Create > UI Toolkit > UI Document.
Both files must have the same name.
The .cs file acts as the code-behind for the .uxml.
In Haikara, this is called a View class.
Here, we create FirstSample.cs and FirstSample.uxml.
4. Editing .uxml
For elements that require data binding, give them a name.
By naming them, a list of element names is generated on the View class side, enabling safe identification of target VisualElements.
Edit the .uxml as follows. You can edit either via the UI Builder or directly editing the .uxml.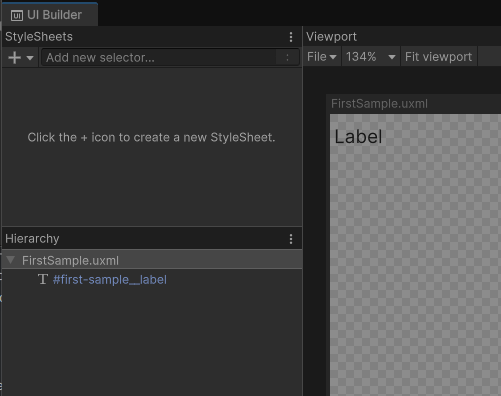
Example .uxml file:
<ui:UXML xmlns:xsi="http://www.w3.org/2001/XMLSchema-instance" xmlns:ui="UnityEngine.UIElements"
         xmlns:uie="UnityEditor.UIElements" noNamespaceSchemaLocation="../../../../../UIElementsSchema/UIElements.xsd">
    <ui:Label text="Label" name="first-sample__label"/>
</ui:UXML>
5. Editing the View class
The View class requires the following elements:
namespace
A namespace is required to link the original View class and the SourceGenerator-generated code one-to-one.partial modifier
Since SourceGenerator will generate code, the View class must be defined as partial.HaikaraUI Attribute
An attribute required to recognize the class as being associated with a .uxml (or .uss) file.
See HaikaraUI Attribute for details.Inherit from HaikaraView Inheritance required to generate binding for VisualElements.
HaikaraViewBaseWithViewModel is the HaikaraView class suitable for ViewModel binding.
Edit the View class as follows (write the namespace to match your environment):
using Haikara.Runtime;
using Haikara.Runtime.View;

namespace Haikara.Samples.FirstSample.Runtime.View
{
    [HaikaraUI]
    public partial class FirstSample : HaikaraViewBaseWithViewModel<FirstSampleViewModel>
    {

    }
}
Once written up to this point, you can confirm that the partial class for the View is generated by the SourceGenerator.
Confirm that the following code is generated:
- {namespace}.FirstSample.g.cs
- {namespace}.ViewInstaller.g.cs
In JetBrains Rider, you can check the generated code under Dependencies in the target assembly (csproj) from the Project Tool Window.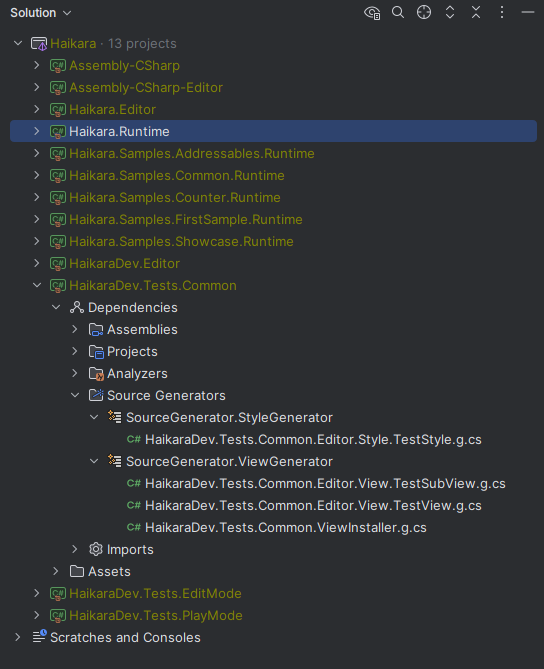
For details on the generated code, see View source generation and View Installer.
6. Declaring binding definitions
Declare in the View code which VisualElement to bind to which property on the ViewModel.
Declare the following BindableProperty in the View class. You may need to use using Unity.Properties and using UnityEngine.UIElements as needed.
        private static readonly BindableProperty<Label> LabelProperty =
            BindableProperty<Label>.Create(
                bindingId: PropertyPath.FromName(nameof(Label.text)),
                dataSourcePath: PropertyPath.FromName(nameof(FirstSampleViewModel.Label)),
                elementNameInfo: ElementNames.FirstSampleLabel
            );
7. Running the UI
To actually display the created UI, create a class that inherits from HaikaraManager as follows:
using Haikara.Runtime;

namespace Haikara.Samples.FirstSample.Runtime
{
    public class FirstSampleManager : HaikaraManager
    {
        protected override async void Initialize(HaikaraUIContext uiContext)
        {
            var view = new View.FirstSample();
            await view.LoadAndAddToAsync(uiDocument.rootVisualElement);
            view.SetDataSource(new FirstSampleViewModel());
        }
    }
}
Attach the created class to a GameObject in an appropriate scene that has a UI Document component attached.
For the UI Document component, see here.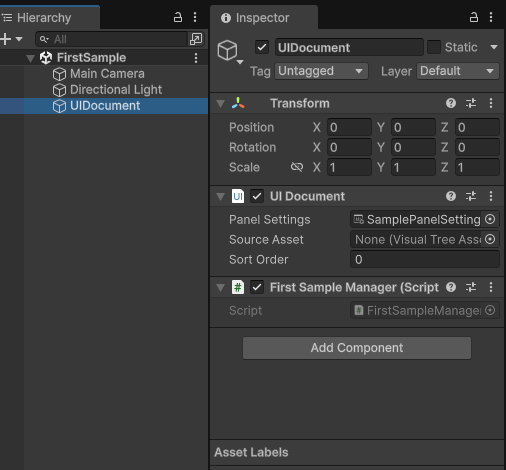
When you enter play mode, you should see "Hello, Haikara!" displayed on the label.
This completes the Haikara tutorial.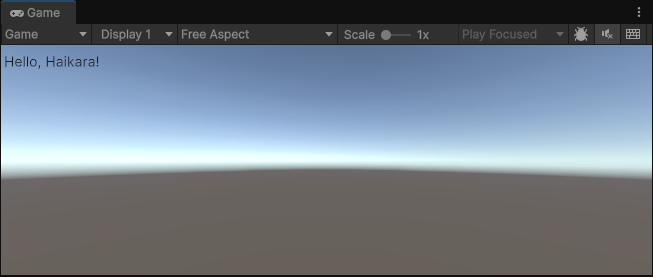
About file structure
The following file structure is required to generate code corresponding to .uxml and .uss:
Assets
└ Scripts
    └ Runtime
        ├ Scripts.Runtime.asmdef
        ├ View.uxml
        └ View.cs
Scripts,Runtime
The folder name can be anything.Scripts.Runtime.asmdef
An .asmdef must be created for code generation via SourceGenerator.
In theAssembly Definition Referencesof the .asmdef you created, referenceHaikara.Runtime.asmdef.
Note that the SourceGenerator ignores code inAssembly-CSharp,Assembly-CSharp-Editor, and assemblies that do not referenceHaikara.Runtime.View.uxml,View.cs Haikara recognizes .cs and .uxml (or .uss) with the same name (excluding the extension), in the same assembly and at the same hierarchy, as corresponding files.
In the example above,View.csandView.uxmlare the corresponding View files.